App Dev · · 4 min read
NetLay: Photos, and cables that go where the cables go
Two things you only miss standing in a comms room, a picture of the box you are hunting for and a line on the map that follows the route the real cable takes.
A picture of the actual box#
There is a particular moment in a comms room where you are holding a printout, looking at a rack, and the thing you are looking for is not where the printout says it is. What would help enormously at that moment is a photograph.
So devices, switches and cabinets can hold photos now. As many as you like, each tagged as front, rear, label and serial, ports, cabling, location or damage, with a caption.
The part I like best took about four lines. The take photo button is an ordinary file input with a capture attribute on it, which on a phone opens the camera directly. No app to install, no pairing, no upload flow to build. You are stood in front of the rack with your phone, you press the button, you take the picture, and it is attached to that switch. On a desktop the same button lets you add several files at once.
There is a viewer with arrow keys to move between pictures where you can fix the tag and caption, and anything tagged as damage gets a red marker on its thumbnail, because the photo of the chewed cable is the one you want to find again in a hurry.
Photos travel inside the JSON export like the building images do, and orphaned files get swept at startup, although only files with the right prefix so a sweep can never reach anything it did not put there.
Straight lines lie.#
Now the other half, which had been bothering me since about post three.
A device line is drawn straight from the device to its switch. The real cable does not go that way. It goes up the wall, along the tray, round the outside of two rooms and into the cabinet, and the straight line on the map cuts diagonally across three cabinets that the cable goes nowhere near.
That is a small lie that gets worse as a map fills up, because eventually the line passes straight through other devices and you cannot tell which cable belongs to what.
Routing round things.#
So cables can route themselves around obstacles. It is off by default and turned on per layout, because it changes how every line on the map looks and that should be somebody's decision.
Underneath it is an A* search on a sixteen pixel grid, where the obstacles are cabinets, hubs, devices, host cards and group cards, each inflated slightly so lines do not graze their edges, and with the line's own two ends excluded so it can actually leave and arrive.
The detail that made the results look right rather than merely correct is that the search state includes which direction you were travelling. That lets a turn cost more than going straight on, which means the routes come out with two or three decisive bends instead of a staircase of forty tiny ones, and it can never produce a U-turn.
There are escape hatches at both ends. If the straight line was already clear, it stays straight. If the search area is enormous or nothing is found, it falls back to straight rather than hanging. Results are cached per layout, so panning and zooming cost nothing.
It applies to cabled lines only. Virtual machine and wireless links stay straight, because those are relationships rather than cables and routing them round a cabinet would be inventing a physical path that does not exist.
Pinning the route you know is right.#
Automatic routing avoids obstacles. It still has no idea where your cable tray is.
So you can pin the route yourself. Select a device or click an uplink and the line grows handles, a plus on each segment and a square on each bend. Drag a plus to add a bend, drag a square to move one, double click to remove it. Drag a corner of an automatically routed line and the whole route becomes pinned, because at that point you have clearly decided you know better than the algorithm, which you do.
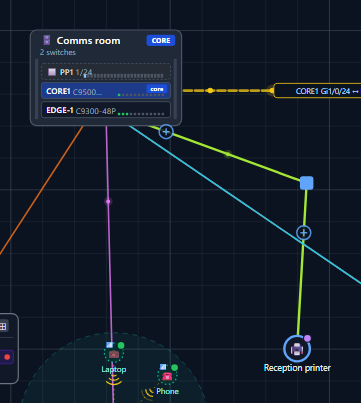
Pinned bends always win, whether automatic routing is on or off.
One mechanical note for anyone building something similar. The handle you are dragging gets replaced mid-drag, because adding a bend turns one segment into two and the element under your finger ceases to exist. The pointer listeners have to live at the window level and keep hold of what you grabbed, not on the handle itself.
Uplinks became selectable while I was in there, with their own small inspector for medium, length, notes and route, which is something they should have had about ten posts ago.
Next time, a manual made entirely of screenshots.